In many cases you will begin developing your website in a subfolder and once it is ready you will consider to move the website to the domain root so it can be directly accessible with the domain name you are using.
This tutorial will provide you with detailed information on how this process should be handled easily and bug free in few simple steps.
STEP 1Changing the URL
We will begin with changing the URL for your website. This is required due to the fact that if your website is currently located in a subfolder you are using URL like the following to access it:
example.com/wordpress
Where “/wordpress” is the subfolder name and “example.com” is your actual domain name.
In order to remove the subfolder from the URL you will need to login into your WordPress admin area and navigate to Settings > General.

Once you click on the “General” link you will be redirected to a page where different settings are presented. Those you are interested in are “WordPress Address (URL)” and “Site Address (URL)”.

You will need to update the values for these fields removing the subfolder name so only the domain name can remain a value for these.
Once you are ready you will need to scroll down to the bottom of the page and use the “Save Changes” button in order for the changes you have performed to be saved. You will then be redirected to 404 Not Found error page, however you should not be worried about it.
STEP 2Moving the files of your website
Next you will need to move the files for your WordPress based website from the subfolder into your domain’s root folder. This is usually the public_html folder of your account and you should make sure that the folder does not contain a website files in it so you can avoid issues related to loss of data for the website currently available under your domain name.
The easiest way of performing actual move of the files is the FTP service. If you are not quite sure how this service works or if you are not familiar with the service at all please check out our FTP Tutorial Series.
Once you connect to the FTP service for your website you will need to move the files from your subfolder to your public_html folder. This can be easily done by selecting all of the files and drag-and-dropping them into the public_html folder for your account.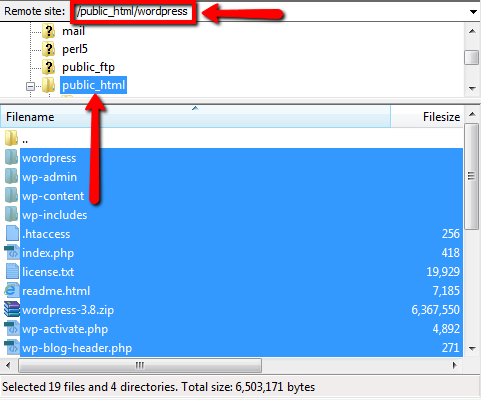
Once you are done with that action and all of the files for your website are now located in thepublic_html folder for your account and not the subfolder they were located into the migration is almost finished.
STEP 3Editing the .htaccess file
The last thing you will need to check is if your website was using “Permalinks”. This can be easily achieved if you check the content of the .htaccess file (already moved with all of the files into thepublic_html directory of your account).
If you have used “Permalinks”, most probably the .htaccess file will look similar to the following code.
# BEGIN WordPress
<IfModulemod_rewrite.c>
RewriteEngine On
RewriteBase /wordpess/
RewriteRule ^index\.php$ - [L]
RewriteCond %{REQUEST_FILENAME} !-f
RewriteCond %{REQUEST_FILENAME} !-d
RewriteRule . /wp/index.php [L]
</IfModule>
You will need to edit this code so you can properly apply the new location of your website so the edited file will look like the following piece of code:
# BEGIN WordPress
<IfModulemod_rewrite.c>
RewriteEngine On
RewriteBase /
RewriteRule ^index\.php$ - [L]
RewriteCond %{REQUEST_FILENAME} !-f
RewriteCond %{REQUEST_FILENAME} !-d
RewriteRule . /index.php [L]
</IfModule>
Once you are done with this final edit you can visit your website at its new URL which will be your domain name but this time without the subfolder following it.
Congratulations! You have successfully changed the location of your WordPress installation!
